Indoor Wall Mosaics Kits How-To
1. In the Box
◽ Substrate - Board with mosaic design
◽ Glue - Water washable PVA glue
◽ Tiles - Cut respective colours to fit the mosaic design and glue onto the substrate
◽ Tile Nipper (if included in purchase)
◽ Tweezers (if included in purchase) - To handle small tesserae
2. Set up a Mosaic Work Area
◽ Clear space on a flat and level table. Make sure you have space for the substrate, glue, tweezers, and some loose tile fragments. It is important that the surface is level so tesserae do not move when glue is dry.
◽ Cover the work area with scrap paper to protect the table and simplify cleanup.
◽ Set up the packaging box as a "cutting station" on the side. Cut tiles within the box so loose tile fragments fall into the box.
◽ Arrange the work area for a comfortable posture to avoid strain.
◽ Ensure the work area and "cutting station" are well lit.
◽ (Prepare a playlist) 🎵
3. Recommended Sequence
◽ Cut tiles based on colour or number to fit the mosaic design. Glue onto the substrate with the smooth side facing up.
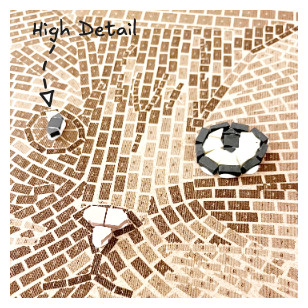
◽ Begin with high detail areas. For example, the eyes and pupils of the subject. Work inside-out on these areas.
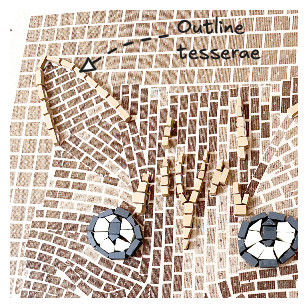
◽ Proceed to the outlines of the subject. For example, the outlines of the ears.
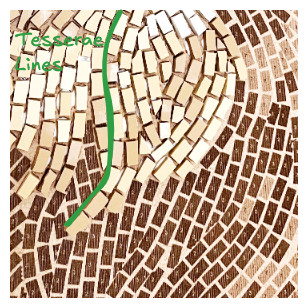
◽ Next, fill in the subject. The tesserae form lines like brush strokes in a painting. Work in clusters of tesserae that form lines in the same direction. Progress from the top of the subject to the bottom.
◽ Work on the background when the subject is filled. It is generally easier to work from left to right for right handers and vice versa for left handers.
◽ Finish the mosaic with the border tesserae.
4. Cutting tiles
◽ We recommend that you wear protective eye wear and gloves. The tile nipper has sharp edges, proceed with care. Keep the tile nipper and any loose tile fragments away from people and pets..
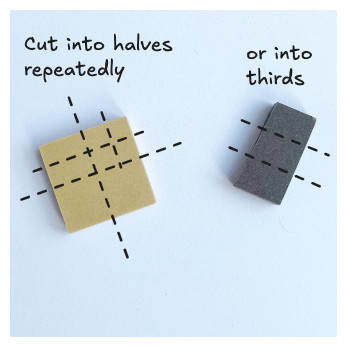
◽ Half each tile repeatedly to get a fragment or tessera close the the required size. Then trim to create the specific shape required. Occasionally, it may be better to cut a tile fragment into thirds to get close to the desired size.
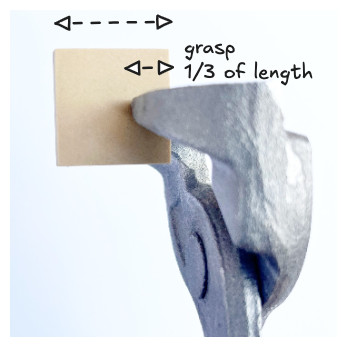
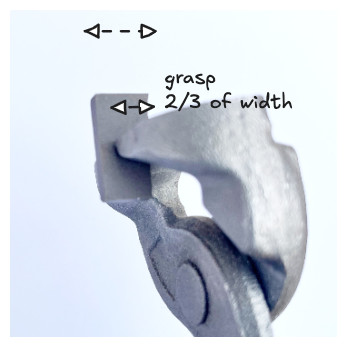
◽ To cut, the nipper jaws do not need to grasp the entire length of the tile. When starting with a new tile, grasp about a third of the tile length. With smaller fragments, grasp half or two-thirds of the length.
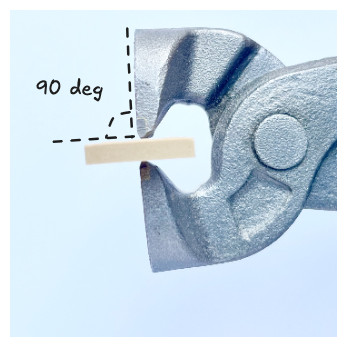
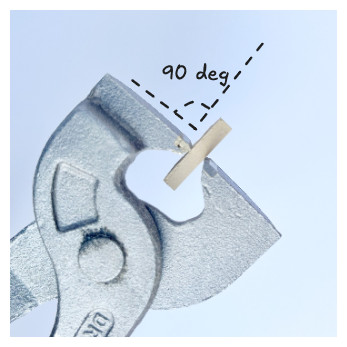
◽ Ensure that the nipper jaw is perpendicular to the tile before cutting.
5. Gluing
◽ Squeeze a blob of glue onto a scrap paper. Squeeze enough for just about 10 minutes of gluing. Ensure to close the cap of the glue container to prevent the glue from drying out.
◽ Once a tessera is ready to glue, hold it (with tweezers) and dab on some glue from the blob on the scrap paper.
◽ Position the tessera on the substrate and give it a gentle press to ensure good contact of the glue with both the substrate and the tessera. Leave excess glue squeezed out from the sides of the tessera. The PVA glue is transparent when it dries.
6. Small and Difficult Tesserae
◽ The design may contain small and fragmented tesserae, some without space for a numeric digit to represent the color or material. For example:
◽ For example, this image shows a thin tessera partially occluded below the number 3 tessera:

◽ Please refer to the printed color reference to identify what colors these tesserae are or put on your creative hat to place tesserae as you see fit in these areas!